Text Structure (HOW 7-12)
The HOW of text structure

Secondary: HOW we teach text structure
In our experience, teaching Text Structure is a powerful support for learners of all ages, and its impact is especially noticeable in secondary classrooms. This week, we are sharing a strategy that we have found transformative in our practice: Text Structure Skeletons. The reason we are sharing this strategy is because we often hear reflections like the one below from secondary teachers:
“Students can explain their ideas verbally, but when asked to write those ideas in more complex forms, such as paragraphs, essays, or analyses, the writing does not match the quality of their thinking. It is often simple, loosely organized, and lacking clarity.”
If this sounds familiar, you are not alone. Today’s strategy can help bridge this gap.
Strategy: TEXT STRUCTURE SKELETONS
Each of the six Text Structures has a predictable thinking pattern. Text Structure skeletons, adapted from the work of Adrienne Gear (2014), make the underlying thinking pattern visible on the page. Think of the skeleton as the essential bones of the structure; they are the pieces students need to communicate their ideas clearly and effectively. Although we use skeletons across K to 12, the example below comes from a Grade 9 class studying the persuasive Text Structure.
1. Choose one focus Text Structure and its corresponding skeleton. For this lesson, we used the persuasive Text Structure with the skeleton: WHAT, WHY, WHY, WHY, WHAT AGAIN.
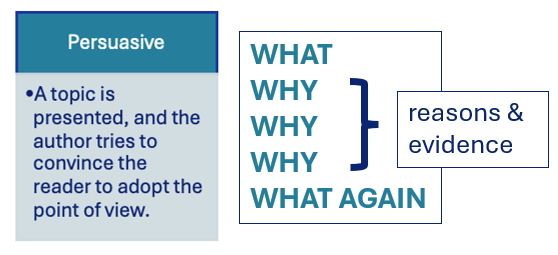
2. Explicitly teach the skeleton. Make the thinking pattern visible, explaining to students that this is a tool to help organize your ideas to make sure your message is clear.
Tip: Add the skeleton to your anchor chart (see last week’s newsletter for sample anchor charts). Keep it visible and accessible to your students.
3. Examine the skeleton in mentor text. This shows students how authors use the pattern.
Tip: Have students collaboratively annotate the mentor text together, finding evidence of the skeleton in context. Consider AI as a tool to support the design of your mentor text, and weave in your disciplinary content.
4. Highlight signal words. Embed signal words (transition words) in your mentor text so students see them in context. Align these words with the different parts of the skeleton; this helps students transfer these words into their own writing.
5. Practice using the skeleton. In small groups, have students collaboratively produce writing to build confidence and fluency before they apply the skeleton in upcoming independent writing assignments.
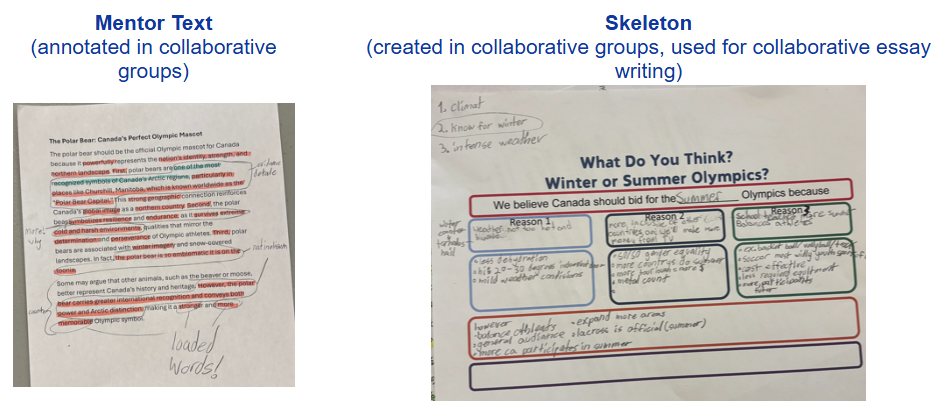
Check out the grade 9 collaborative student samples below. On the left is a mentor text (step 3) we used to illustrate the persuasive Text Structure at work. In small groups, students annotated the text for evidence of the skeleton and signal words. On the right is a graphic organizer with an expanded skeleton embedded acting as a note-taking page (step 5). Students collaboratively captured their ideas in the graphic organizer, and then transferred them to a persuasive essay.
In closing
Across this series, we have explored what Text Structure is, why it matters, and how to bring it to life in classrooms from kindergarten through Grade 12. When we teach the thinking patterns that underpin writing, we give students a powerful tool. They learn how to organize their ideas, communicate clearly, and engage deeply with content across all subject areas.